Welcome to REPLIKA

REPLIKA is a true-stereo delay effect that is used as a plug-in in your DAW. It can be used to create a range of different echo and reverb effects.

Based on both vintage and contemporary delay units it features three unique styles, each with their own distinct sound character: Modern, Vintage Digital, and Diffusion. The additional phaser or filter allows you to further sculpt the sound of your delays. The Delay section lets you choose between different stereo modes, including a basic stereo echo mode, a wide echo mode, and a ping-pong echo mode.

REPLIKA can be used to create high-quality echo effects with a twist, enabling you to create sounds ranging from rhythmic echoes and vintage delays to otherworldly reverb effects.

REP_Overview.png

The REPLIKA plug-in

Document Conventions

In this document the following formatting is used to highlight useful information:

Italics

Indicates paths to locations on your hard disk or other storage devices

Bold

Highlights important names, concepts, and software interface elements.

[Brackets]

References keys on a computer’s keyboard

•

Single item instructions are represented by a bullet icon.

→

Results in procedures are represented by an arrow icon.

The following three icons represent different types of information:

Tip

The light bulb icon indicates a useful tip, suggestion, or interesting fact.

Notice

The information icon highlights important information that is essential for the given context.

Caution

The warning icon alerts you of serious issues and potential risks that require your full attention.


Overview

REPLIKA's interface consists of three main sections: the Delay section is where you find the general delay controls, the Style section is where you define the sound of the delay, and the Modulation section is where you add effects to the delay.
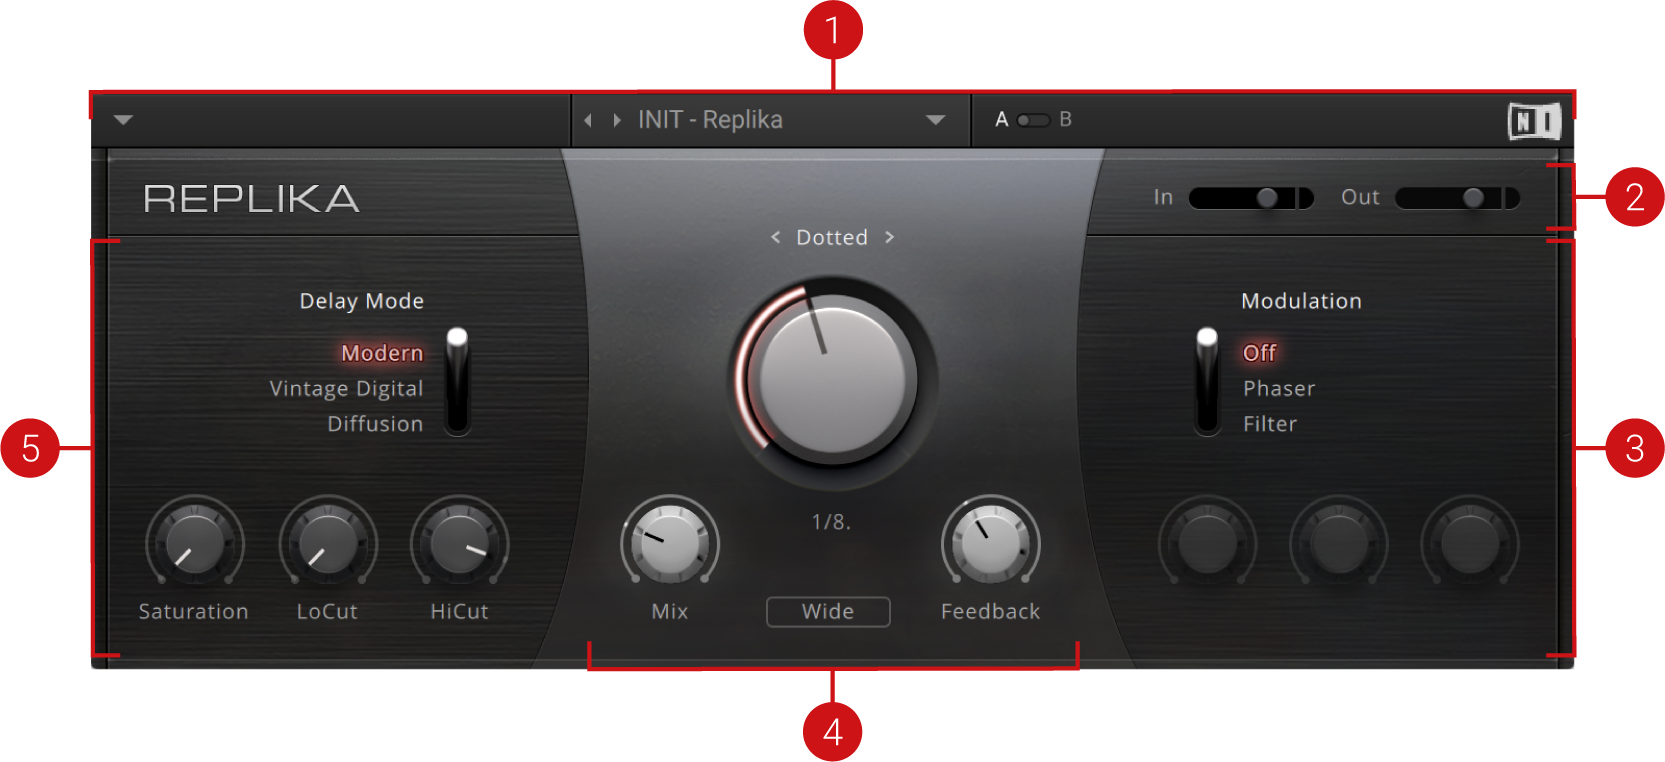
REP_Callouts_Callouts.png
  1. Header: Provides global functions related to preset management and plug-in behavior. For more information, refer to Header and Presets.

  2. Volume Control: The In and Out controls allow you to adjust the signal levels for REPLIKA’s stereo input and stereo output, respectively. The red indicators light up when a signal exceeds 0 dBfs.

  3. Modulation section: Enables you select a Modulation effect and change its parameters. The available effects include a phaser and a resonant filter. For more information, refer to .

  4. Delay section: Enables you to set the main delay parameters like Delay Time, Feedback, and Mix. For more information, refer to Delay Section.

  5. Style section: Enables you to select a delay Style and change its parameters. The available Styles include a clean contemporary delay, an emulation of a vintage digital delay, and a reverb effect. For more information, refer to Style Section.


Header and Presets

The header provides global functions related to preset management and plug-in behavior.

It consists of the following menus and and settings:

FXF_General_Header_Overview_Callouts.png
  1. Main menu: Provides you with options for managing user presets and adjusting the plug-in's visual appearance. For more information, refer to Main Menu.

  2. Preset menu: Allows you to access all factory and user presets. For more information, refer to Loading Presets.

  3. A/B Comparison switch: Allows you to compare two sets of settings, called A and B. For more information, refer to Comparing Parameter Settings.

  4. NI logo: Opens the About screen, which shows the version number of the plug-in.

Loading Presets

REPLIKA includes a wide range of factory presets that make full use of its features. You can put them to use in your music right away, or explore their sound and settings to familiarize yourself with the effect.

All presets can be loaded directly from the user interface by using the Preset menu, including your own user presets.

  • Click the left and right arrows on the left side of the Preset menu to cycle through all presets and load them one after the other.

    FXF_General_Switch_Presets.png

Alternatively, you can load presets from a list that is organized in categories.

  1. Click the Preset menu.

    FXF_General_Open_preset_list.png

    The Preset menu shows a list of all available presets. Various categories of factory presets and user presets are available in separate submenus.

  2. Click an entry in the list.

    The corresponding preset is loaded and can be used.

Tip

The INIT preset contains basic settings that are useful as a starting point for creating your own effect sounds.

Quick Access List

Below the Factory Presets and User Presets you'll find the Quick Access list. If you load a preset from the User Presets submenu, the next time you open the Preset menu the Quick Access list will show all user presets. If you load a preset from the Factory Presets submenu, the next time you open the Preset menu the Quick Access list will show all factory presets.

Comparing Parameter Settings

The A/B Comparison switch can help you to fine-tune your settings. It is located to the right of the Preset menu in the Header:

FXF_General_AB_Comparison_Callout.png

The A/B Comparison switch in the Header.

It features two temporary memory slots A and B that you can use to quickly switch between two sets of parameter settings. This makes it easy to compare different settings and find the ones you like.

To use the A/B Comparison switch:

  1. Create an effect sound you like. All parameter settings are automatically saved to slot A.

  2. Click on B to switch to the second slot. When you switch to slot B for the first time, it automatically takes over all the settings from slot A.

  3. Adjust parameters to create an alternative effect sound. All settings are automatically stored in slot B.

  4. Click A and B to switch between the two variations of your effect sound.

    The sound changes according to the selected set of parameter settings.

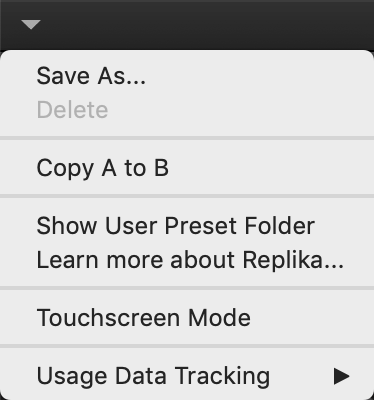
If you want to overwrite the settings saved in the other slot with the settings saved in the currently selected slot, open the Main menu by clicking on the arrow symbol in the left corner of the Header and select Copy A to B or Copy B to A, respectively.

Tip

When you have found an effect sound you like, you can save the settings from the currently selected memory slot of the A/B Comparison switch as a preset. For more information about saving presets, refer to Managing User Presets.

Managing User Presets

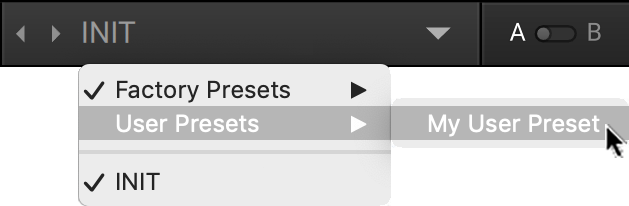
If you have created an effect sound you want to keep for later use, you can save it to the User Preset folder. All presets in the User Preset folder are available under User Presets in the Preset menu, enabling you to access your personal library of effect sounds directly from the user interface.

FXF_General_User_Preset.png

A User preset in the Preset menu

Saving a New User Preset

To save a user preset:

  1. Open the Main menu by clicking on the arrow symbol on the left corner of the Header and select Save as….

  2. Enter a new name for your preset in the Save New Preset dialog box.

  3. Click OK to finish the process and close the dialog box.

    Your user preset is saved in the User Preset folder.

Deleting a User Preset

You can delete the current user preset via the Main menu.

Note

Factory presets cannot be deleted.

To delete the current user preset:

  • Open the Main menu by clicking on the arrow symbol on the left corner of the Header and select Delete.

User Preset Folder

The User Preset folder contains all of your saved user presets. You can copy, delete or change the name of user presets directly in the folder on your hard drive.

Note

The plug-in needs to be reloaded in order to reflect any changes made in the User Preset folder.

  • To show the User Preset folder on your hard drive, open the Main menu by clicking on the arrow symbol in the left corner of the Header and select Show User Preset Folder.


Delay Section

The Delay section allows to you control the general aspects of your delay sound, including parameters like Delay Time, Feedback, and Mix.

REPLIKA can be configured as a basic stereo echo, a wide stereo echo, or a ping-pong echo using the Stereo Mode switch.

REP_Delay_Section_Callouts.png
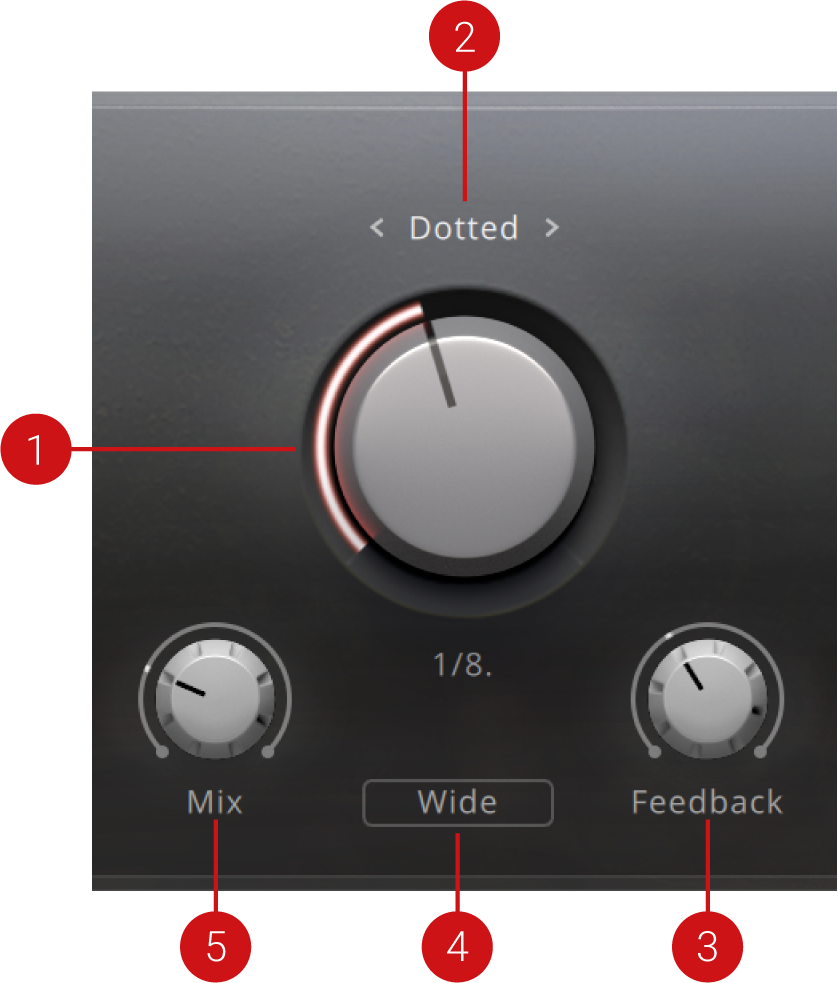
  1. Time: Adjusts the delay time. Depending on the selected Time mode, the delay time is either synchronized to the tempo of the DAW and set in note divisions, or freely adjusted in milliseconds.

    Note

    The maximum delay time is 4000 ms, which can be achieved by settings a synchronized delay time of 2/1 at a tempo of 120 BPM. Slower tempos will limit the maximum delay time accordingly, which is reflected visually by the range of the Time control.

  2. Time mode: Selects between four modes that determine the behavior of the Time control. You can select the mode by clicking on the left and right arrows next to the mode name, or show the TIME menu in the display by clicking on the mode name. The following modes are available:

    • ms: The delay time can bee freely adjusted in milliseconds.

    • Straight: The delay time can be adjusted in even note divisions (1/16, 1/8, 1/4, etc.) relative to the tempo of the Metronome.

    • Dotted: The delay time can be adjusted in dotted note divisions (1/16d, 1/8d, 1/4d, etc.) relative to the tempo of the Metronome.

    • Triplets: The delay time can be adjusted in triplet note divisions (1/16t, 1/8t, 1/4t, etc.) relative to the tempo of the Metronome.

  3. Feedback: Adjusts the level of the signal that is being fed back to the delay's input. Increasing the feedback level creates more delay repeats that decay over time. Feedback levels of 100% and above are possible, allowing the delay repeats to build up until the point of self-oscillation.

  4. Stereo Mode: Switches between three modes that determine the stereo image of the echo effect.

    • Normal: Basic stereo echo with simultaneous delay taps on the left and right channel.

    • Wide: Wide stereo echo with a slight timing offset between delay taps on the left and right channel.

    • Ping Pong: Ping-pong stereo echo with alternating delay taps on the left and right channel.

  5. Mix: Blends between the input signal and the effect signal by means of an equal-power crossfade.


Style Section

REPLIKA offers three distinct delay styles, each with their own unique sound and behavior. They all share the same settings in the Delay section, so you can switch between styles while keeping all your basic delay parameters intact. Each style has a set of additional parameters that enables you to further adjust the character of the delay.

The following styles are available:

  • Modern: Clean and defined delay with adjustable, tube-like saturation. It has a delay time range of 1-2000 ms, or 1/64 to 2/1 in synchronized Time modes. For more information, refer to Modern.

  • Vintage Digital: Warm and crunchy emulation of early digital delay effects. It has a delay time range of 20-2000 ms, or 1/64 to 2/1 in synchronized Time modes. For more information, refer to Vintage Digital.

  • Diffusion: Clean delay combined with a unique reverb effect. It has a delay time range of 1-2000 ms, or 1/64 to 2/1 in synchronized Time modes.For more information, refer to Diffusion.

Modern

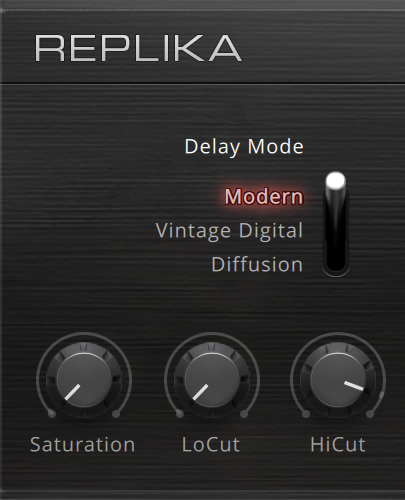
The Modern style is a clean and defined delay that can be further shaped with its adjustable, tube-like Saturation. Manual adjustments of the delay time do not alter the pitch of the delay signal.

REP_Style_Section_Modern.png
  • Saturation: Adds tube-like saturation at the delay input. Turned all the way to the left, the knob bypasses saturation, turning it to the right pushes the sound from subtle warmth to overdrive. The amount of saturation is dependent on the input level.

  • Low Cut: Attenuates low-frequency content in the feedback path of the delay using a low-cut filter. Turned all the way to the left, the filter is off. Turning it to the right raises the cutoff frequency of the filter, resulting in a brighter tone of the delay.

  • Hi Cut: Attenuates high-frequency content in the feedback path of the delay using a high-cut filter. Turned all the way to the right, the filter is off. Turning it to the left lowers the cutoff frequency of the filter, resulting in a darker tone of the delay.

Vintage Digital

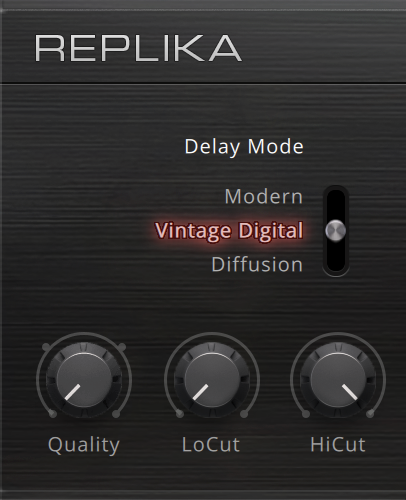
The Vintage Digital style emulates the warm and crunchy sound of early digital delay effects. Four different Quality settings available, ranging from a bright sound with subtle textures to strong digital artifacts. The sound of the delay depends on the delay time. As the delay time is increased, the delay repeats will become grittier, with more digital artifacts being introduced to the signal. Adjusting the delay time alters the pitch of the delay signal, which can be used creatively.

Tip

Try doubling the delay time, for example from 1/4 to 1/2. This shifts the delay signal one octave down. In the same way, halving the delay time shifts the delay signal one octave up.

REP_Style_Section_Vintage_Digital.png
  • Quality: Selects one of four quality settings for the delay: High, Medium, Low, Crunch. The High setting has a bright, subtly textured sound. Medium and Low sound darker and grittier. Crunch has a bright sound but also introduces a lot of digital artifacts to the signal.

  • Low Cut: Attenuates low-frequency content in the feedback path of the delay using a low-cut filter. Turned all the way to the left, the filter is off. Turning it to the right raises the cutoff frequency of the filter, resulting in a brighter tone of the delay.

  • Hi Cut: Attenuates high-frequency content in the feedback path of the delay using a high-cut filter. Turned all the way to the right, the filter is off. Turning it to the left lowers the cutoff frequency of the filter, resulting in a darker tone of the delay.

Diffusion

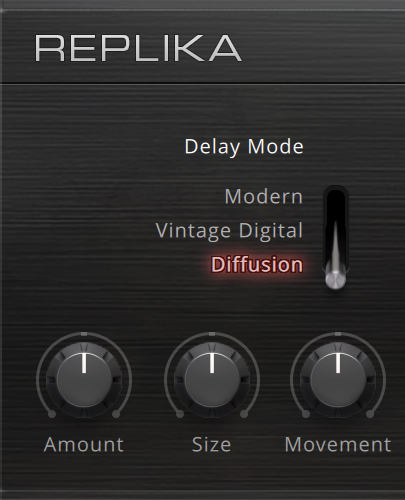
The Diffusion Style links a clean delay to a unique reverb effect. It can be used to create a wide range of different ambiences, from tight and resonant to unnaturally vast spaces. The Amount of diffusion applied to the delay signal is freely adjustable, and the Movement control adds modulation to the reverb effect. Changing the delay time does not alter the pitch of the delay signal. However, adjusting the size of the reverb or increasing the amount of modulation can lead to pitch shifting sounds.

REP_Style_Section_Diffusion.png
  • Amount: Adjusts the amount of diffusion applied to the delay signal, resulting in a reverb effect. High settings make the delay appear out of sync, so low settings are recommended if the rhythmic timing of the delay is essential.

  • Size: Adjusts the swell, reflection pattern and decay of the reverb effect, giving the impression of differently sized spaces.

  • Movement: Adjusts the depth and speed of modulation applied to the diffusion, shifting the timing and pitch of the reflections for a wide reverb effect.


Modulation Section

Abstract

The effects in the Modulation section enable you to further sculpt the sound of your delays, which greatly expands REPLIKA's sonic potential.

The effects available in the Modulation section allow you to further sculpt the sound of your delays, which greatly expands REPLIKA's sonic potential. They can be freely combined with any of the delay styles available in the Style section. Each modulation effect has a unique set of parameters that enables you to change how it affects the delay sound.

The following effects are available:

  • Phaser: Classic modulation effect that applies complex filtering to the delay. For more information, refer to Phaser.

  • Filter: Resonant multi-mode filter that offers full control over the timbre of the delay. For more information, refer to Filter.

Phaser

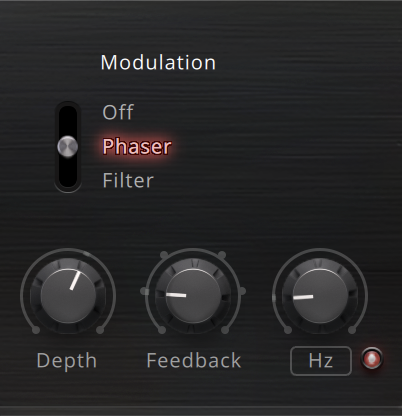
The phaser as an effect both in the studio and on stage is most commonly used for guitars but also keyboards and synthesizers. It creates harmonically unrelated peaks and troughs that move through the frequency spectrum, resulting in a unique filtering effect that smears the sound in interesting ways.

REP_Modulation_Section_Phaser.png
  • Depth: Adjusts the intensity of the phasing effect, creating peaks and troughs in the frequency spectrum.

  • Feedback: Adjusts the amount of feedback, or resonance, applied to the all-pass filters that create the phasing effect. Turning up Feedback makes the peaks and notches in the frequency spectrum more pronounced.

  • Modulation Rate: Adjusts the frequency of the modulation applied to the effect. When Hz/Note is set to Note, the Modulation Rate is set in musical intervals relative to the tempo of the DAW.

  • Hz/Note: Switches between free (Hz) and synchronized (Note) operation for the Modulation Rate control.

Filter

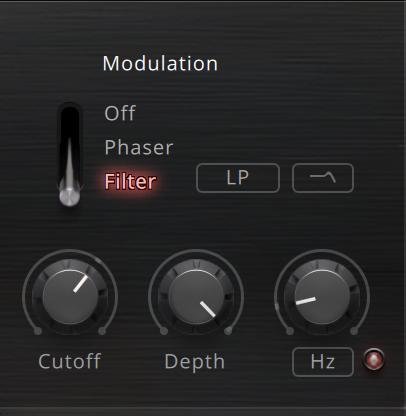
Resonant filters are commonly used in synthesizers to shape the sound of the raw waveforms. The filter is applied to the delay signal, allowing you to create anything from subtle shifts in timbre to dramatic resonances and oscillations. All common filter modes are available, and the internal modulation can be used to create very animated sounds.

REP_Modulation_Section_Filter.png
  • LP/HP/Notch: Switches between three different filter modes that determine the basic sound character, LP (low-pass), HP (high-pass), and Notch.

  • Resonance: Switches between three different resonance amounts of the filter, no resonance, mild resonance, and strong resonance.

  • Cutoff: Adjusts the cutoff frequency. Depending on the setting of the LP/HP/Notch selector frequency content is attenuated above the cutoff frequency (LP), below the cutoff frequency (HP), or at the cutoff frequency (Notch).

  • Depth: Adjusts the intensity of the modulation applied to the effect.

  • Modulation Rate: Adjusts the frequency of the modulation applied to the effect. When Hz/Note is set to Note, the Modulation Rate is set in musical intervals relative to the tempo of the DAW.

  • Hz/Note: Switches between free (Hz) and synchronized (Note) operation for the Modulation Rate control.